8 - Database Application Development
Table of Contents
- Welcome
- Application Development and Design
- Roll of Databases in Software
- N-Tier Development
- Design Methodologies
- Database Access and Connections (AND INSTALLATIONS)
- Summary
Reading Materials
- DBS211 Only - Oracle C++ Call Interface Programmer's Guide
Welcome to Week 8
For this week, we turn the page away from direct database work and look into the world of database application development and how the database fits into the world of software and software development. We will investigate the software development life cycle (SDLC) and then more specifically the database development life cycle (DBDLC) and their various steps.
This week the students will form groups and start to write a simple C++ program to complete a series of simple CRUD statements. The first and hardest part of this is getting the programming environment setup and establishing a connection.
Application Development and Design
 The process of developing
software applications, whether they are web based, windows software, mobile applications and other, are
typically
developed in multiple tiers.
The process of developing
software applications, whether they are web based, windows software, mobile applications and other, are
typically
developed in multiple tiers.
These Tiers typically include:
- Presentation / User Interface / View Layer
- Business Logic / Application Logic / Controller Layer
- Resource Management / Data Access / Model Layer
Each layer is called different things in different perspectives or in different software frameworks. They are essentially synonymous.
Model Layer
The model layer is often design to include software that represents the structure of the database and the DML statements and routines needed to manipulate the data, both reading and writing. This can be accomplished through creating a series of classes that represent the database entities (example: tables) with properties, constructors, and methods that are representative of the database CRUD statements.
Business Logic Layer
The business logic layer is the middle layer that takes input from the user interface and translates it according to business rules and application rules to forward it to the database layer for storage or retrieval. Once the data layer completes it's tasks, the data is sent back to the middle layer, processed, calculations are performed and the results are sent to the user interface appropriately.
The business logic layer is kept separate from the data access and user interface layer such that changes can be made to the business rules with little or no impact on the other layers, due to the separation of concerns in the software development process.
View or User Layer
The User-Interface layer often is a web site, mobile application or a windows application. Access between the user interface according and the business layer can be controlled through user access and role management and if often accessed through an API (Application Programming Interface).
Roll of Databases in Modern Software Development
Almost every modern software application has a database involved in the background. The purpose of the database could be:
- data storage
- data retrieval
- logging and tracking
- inventory management
- user and role management
- and many others....
Therefore, it is important that all software developers have a basic database design and implementation knowledge. In larger companies, software developers rarely touch the database, but even in this case, they still need the knowledge to work as part of the team and to assist with the development of the data model layers of the software.
In smaller development companies, where employees are often involved in many areas of the Software Development Life Cycle (SDLC). including database development, software development and the entire design process. The second half of this course concentrates of the database design aspects of this process and how building a strong database foundation is key to developing strong software.
N-Tier Development and MVC
The reason why a significant amount of software development is completed using the n-tier architecture is such that various aspects of the application can be kept independent for object oriented purposes. Keeping the layer independent allows them to be reusable, and multi-purposed.
The model layer can be shared amongst many different user interfaces and can be reused for many different versions of the application. For example, access to the model layer can be through an API ro directly in the case of administration access systems.
In some cases, software is divided into addition tiers to further separate concerns. One example of this: is to create a security layer that controls and centralizes user access, administration, role management, and permissions to perform specific actions within the business and data tiers.
Design Methods
When designing software, software companies take different approaches to each application developed and the decision is based on the application being developed, the client involved and the project scope and timeline.
Some of the approaches to database driven applications include:
- Bottom-up or database-first approach
- Top-Down or UI-first approach
- Inside-Out or Code-First approach
- Outside-In or Client Centric approach
Bottom-Up or Database-First Approach
 This approach involves developing the database first in the application development process. This means that
a
significant amount of research goes
into the data requirements of the application through the requirements gathering process. Through database
modelling
processes and database normalization,
designers can come up with near complete database designs.
This approach involves developing the database first in the application development process. This means that
a
significant amount of research goes
into the data requirements of the application through the requirements gathering process. Through database
modelling
processes and database normalization,
designers can come up with near complete database designs.
Pros
- developing the database first can ofter result in the ability to automate the code writing process through code generation.
- The coding of the data access or model layers can almost be completely automated
- Also, this approach typically results is fewer iterations and changes to the base foundation layers of the software which often results in smaller development timelines.
Cons
- This approach is sometimes difficult for clients to work with the software team as this approach often results in a long period of time near the start of the project where the client is not involved and would not see any progress that interests them, like screens or anything visible.
- This often results in the client wondering if the software company is performing its tasks, and a relationship breakdown between client and vendor.
- This approach also can result in limitations in the design of the design of the user interface due to code already being written. The iteration approach to the user-interface will be greatly limited.
Top-Down or UI-First Approach
 This approach entails the design of the user interface first. The functionality of the system is defined
from the client's perspective. Many clients are most interested in how the
software works, how it looks and its' ease of use. Therefore,
this part of the application can be perfected with the client first.
This approach entails the design of the user interface first. The functionality of the system is defined
from the client's perspective. Many clients are most interested in how the
software works, how it looks and its' ease of use. Therefore,
this part of the application can be perfected with the client first.
Pros
- ensures early engagement with the client and this often results in more information and communication about software requirements and the ease of use.
- often results in a better user-interface design overall.
- focuses on final goals
- Addresses: functional issues such that the operations are supported and non-functional issues such as performance and availability
Cons
- this approach can lead to increased development time due to ensuring the coding can work for the given interface design. Also, although there is heavy engagement with the client early in the project,
- once the majority of the user-interface is complete, the client often believes the project is near completion, and gets impatient as the remainder of the application is developed without much interaction with the them.
- the system has to be developed entirely from scratch with little code generation or rapid application development techniques available
Inside-Out or Code-First Approach
This approach is similar to the bottom-up approach but focuses on the database access or model layer first built based upon the data requirements gathering process. This object orientated approach allows developer to create the required classes, properties and methods first and then generate the database from the code.
PROS: This approach works well for a team with strong developers, and can give the developers a deep understanding of all the code that will be accessed through the entire development process.
CONS: This approach often results in an incomplete database design and many criteria and database features missing, such is indexes, referential integrity and the use of stored procedures and user-defined functions.
Outside-In or Client Centric Approach
This approach uses the requirements gathering results and simultaneously designs both the database and user interface layers. Then as both ends are developed, they will work inwards towards the business logic layer.
PROS: This balances the client interactive parts of the development with those parts where very little client interaction is involved. This means the client sees continuous and consistent progress through the project and keeps lines of communication open.
CONS: This approach can often result in reiterating the design of both the user interface and data access layers because of considerations determined through the middle or business logic tiers.
Below DBS211 - Only
Database Access and Connections
Since we know that software applications will involve databases, it is obviously that we must learn the process of connecting to them. There are many different ways to connect and we simply can not cover them all, but in general they all work the same. A set of libraries are used that are created by the database manufacturer that are used to establish a connection. By providing a server ip address and a port along with a user name and password, allows the connection to be created. These libraries often contain pre-defined objects such as connections, statements, record sets, and many more that are used to obtain, store and transfer data and sql statements to and from the database.
Connect to an Oracle database within C++ and Visual Studio.
The following is a series of steps that will walk through the process of connecting a C++ application within Visual Studio to your an oracle database.
Step 1 - Installing the required software
For this sample you will require the download of a few software applications and libraries.
Microsoft Visual Studio
Visual Studio Community Edition - Any version of Visual Studio will work, community edition is free of charge to download from MicroSoft. Download Here
Oracle Express Client
Oracle Express Client 18c - The oracle client is required to be installed in order to get the licensing information in addition to the installed libraries. Download Oracle Express from the Oracle website (choose the x64 version) and run it's install, just using the default options. After installing this software you should have a new folder called "app" in your root c drive.
ONLY INSTALL version 18c, newer versions may not work. You may have to click on the "Prior Release Archive" button near the bottom of the page.
Oracle Instant Client and SDK
Oracle Basic Instant Client Basic and SDK 12c - I have downloaded and prepared the basic and sdk versions of the instant client. Download The required Instant Client files. and then extract it to a root drive (c or d) so your path will be something like "C:\instantclient_12_2". You will refer to these files several times later. DO NOT extract these to your desktop.
Advanced: if you want to download these separately yourself here are the individual links (not needed if downloaded the Instant Client files above),
Basic Instant Client files (12.2)
Instant Client SDK files (12.2)
OPTIONAL: if the express client will not install, then you can try to install the main Oracle client.
Unfortunately at this time, Oracle has stopped providing downloads for the 12c client, and trials using 19 have not worked yet. If I can get ahold of that client file, I will update this site with that file later.
Configure Visual Studio Project
In visual studio, create a new project of type C++ Console Empty Application.
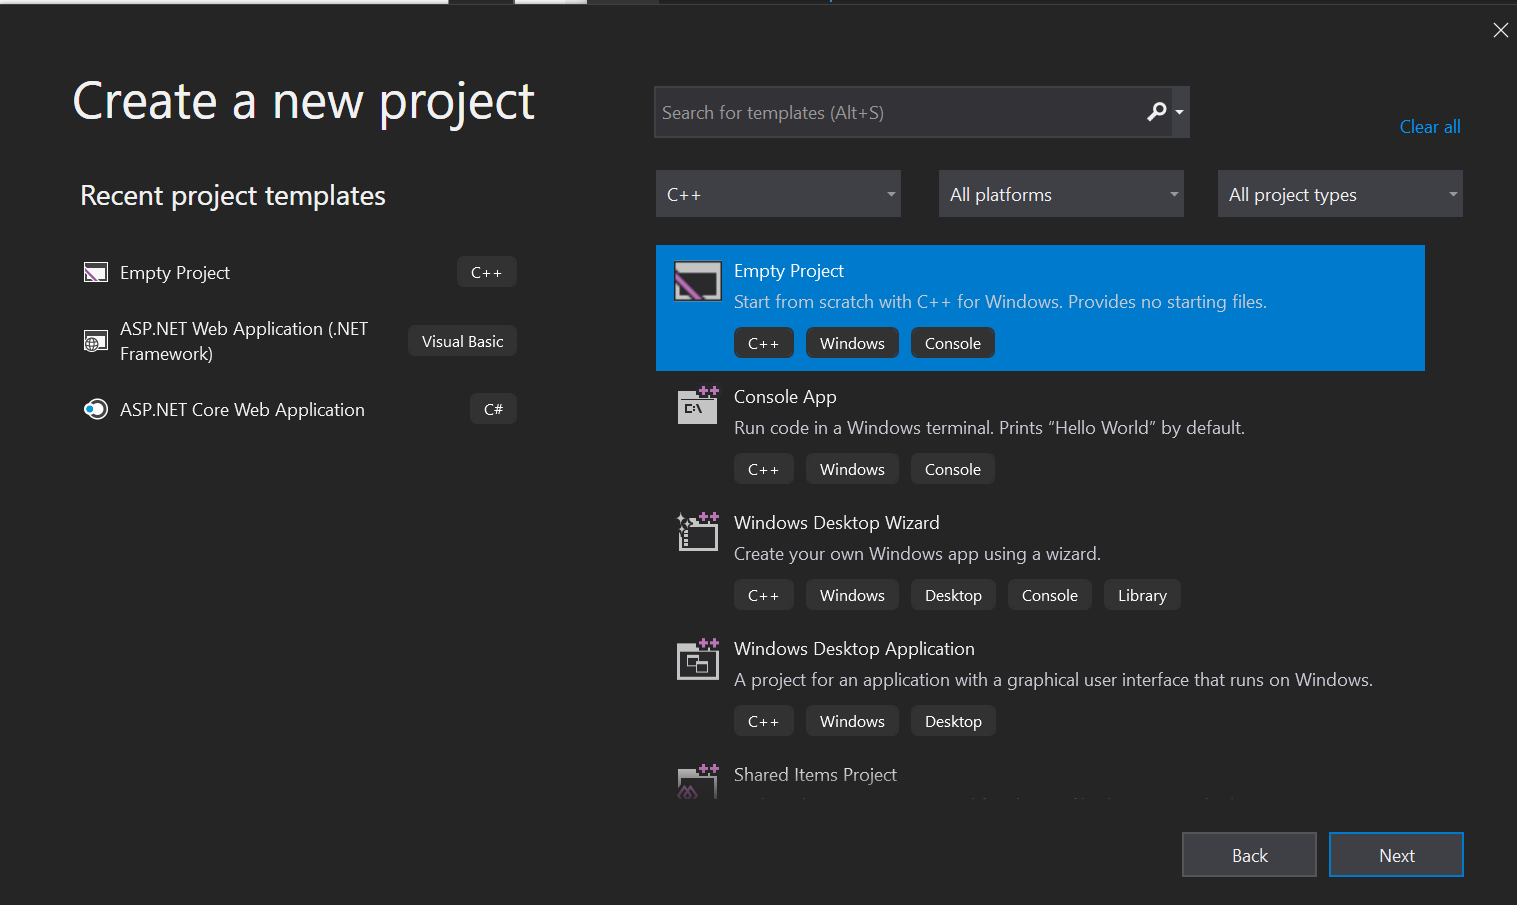
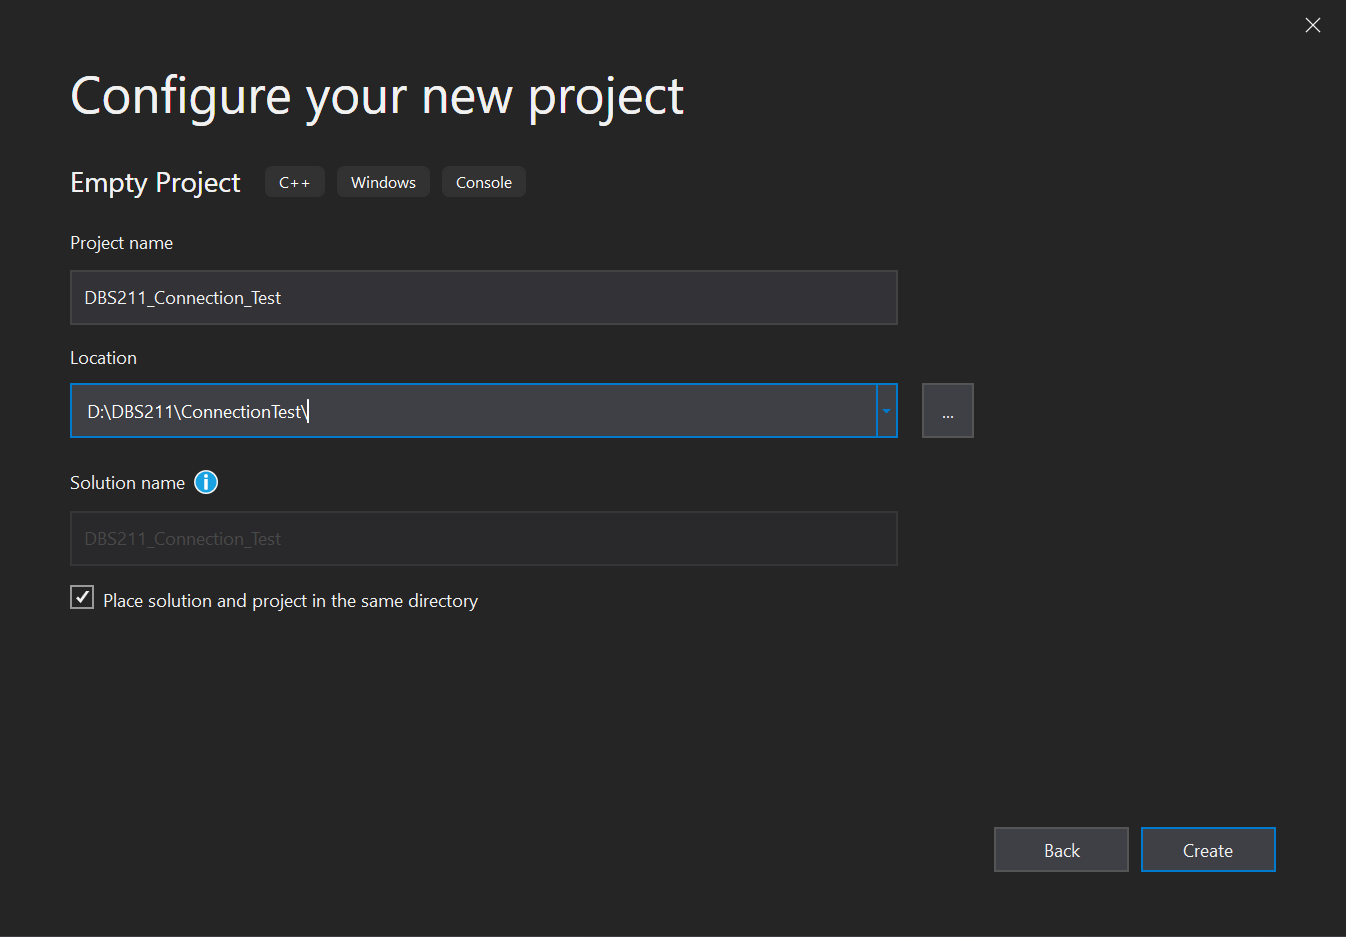
Name the project a name of your choice and select a folder of choice where to store the files. Check place solution and project in the same directory.
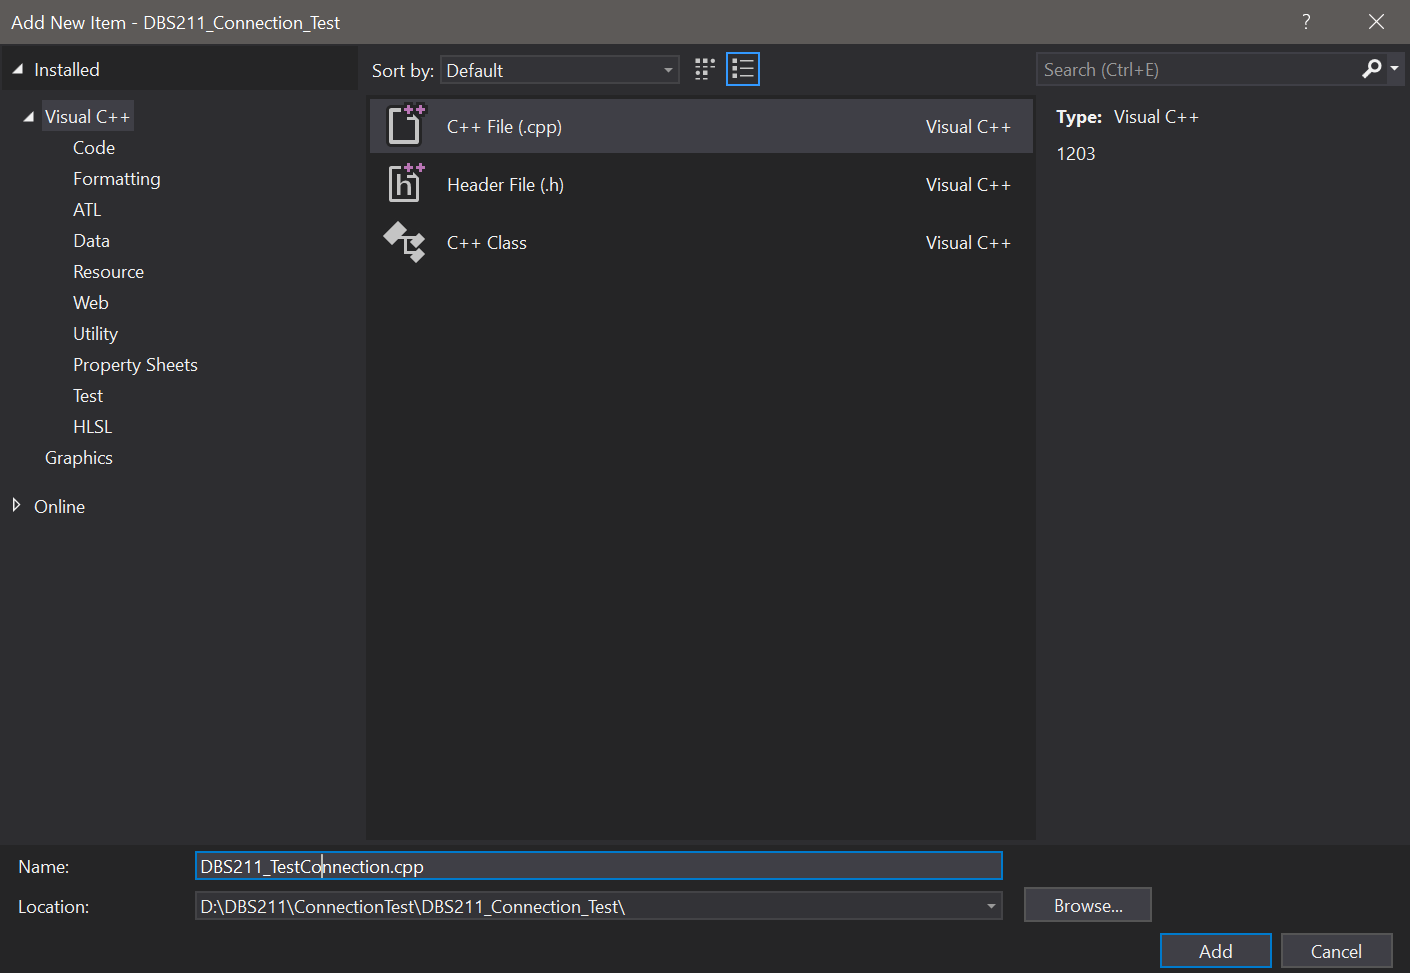
right click on the "Source Files" folder in the solution explorer and choose "Add - new item". Choose a "C++ File (.cpp)". Enter a name of choice, for example: "DBS211_DB_Connection_Test.cpp"
Edit the newly created .cpp file and add the following two lines to the top of the code:
#include <iostream>
#include <occi.h>
and save the file. This makes the project understand that this is a C++ project and adds additional needed configuration options to the properties window. Note, #include line for occi.h will likely give you an error, we are about to fix that.
To connect and work with databases in Oracle server, we use the
Project Properties
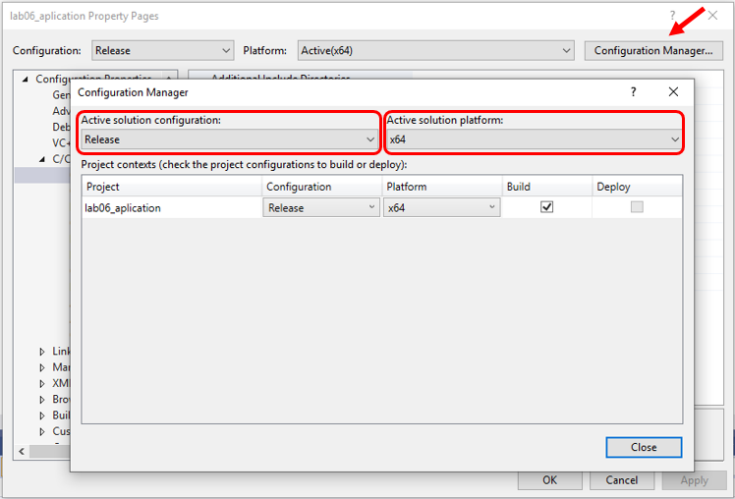
In the “Configuration” dropdown on the top-left, change to “release” and change “Platform” to “x64” and select
“Apply”.
Also, do the same inside the Configuration Options button (select release and
x64).
This step ensures that the Visual Studio project is set to release so other properties that are set apply to this
version.
In real life programming, you would work in Debug version until all testing is done, then change to release and test
again.
Under "Configuration Properties" expand the C/C++ directory and click on "general". On the right side click the drop-down arrow beside “Include Directories” and choose “edit”.
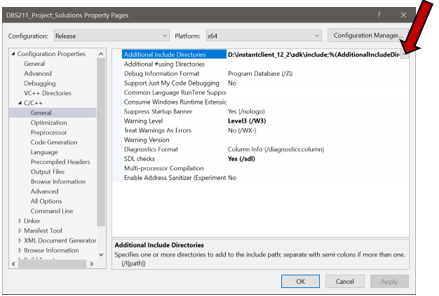
On the new screen (shown right), click on the currently blank top line of the first box and you will see a “…” button. Click on this button and navigate to the folder
[your installation location - example C:]\instantclient_12_2\sdk\includefrom within the directory where you installed the instant client base click
Select Folder. Note: your path may be different then the one shown above as it will
depend on where you extracted the instant client.
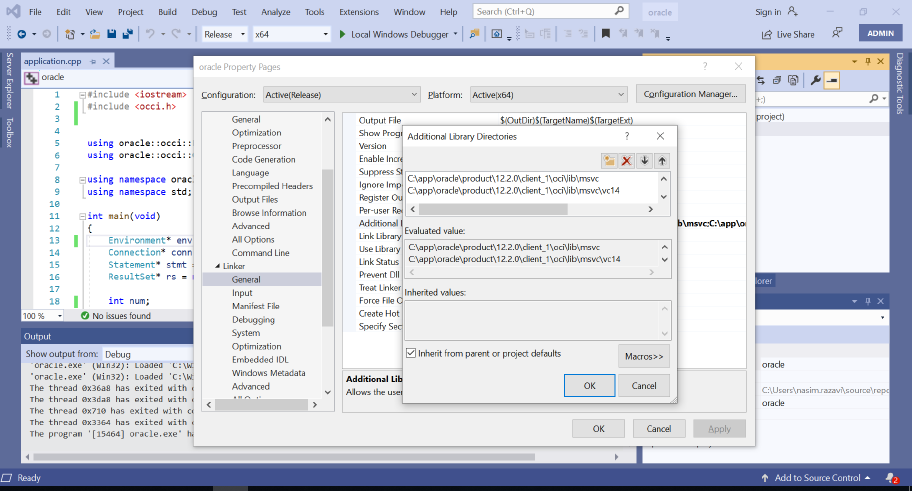
In "Linker/General", add the following paths to the "Additional Library Directories":
[your installation location - example C:]\instantclient_12_2\sdk\lib\msvc\vc14
[your installation location - example C:]\instantclient_12_2\sdk\lib\msvc
[your installation location - example C:]\instantclient_12_2
In "Linker/Input", write "oraocci12.lib" to "Additional Dependencies"
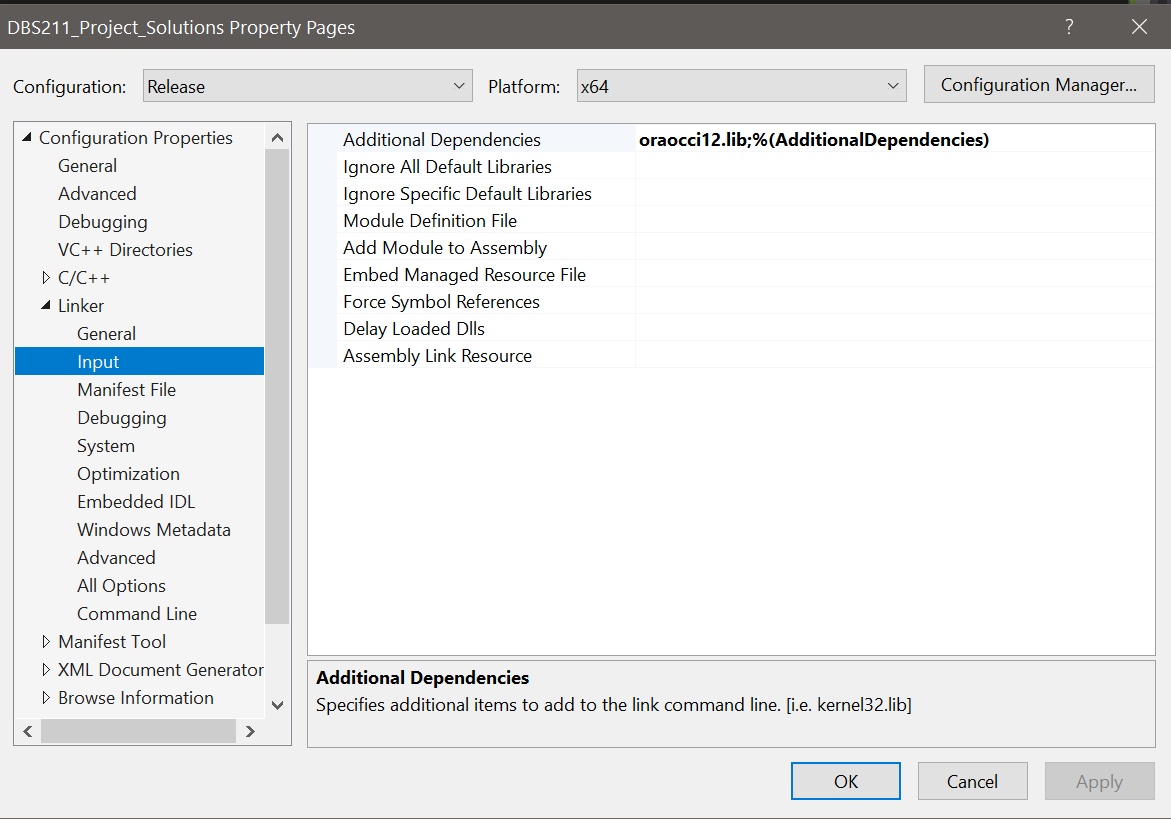
Click Apply and the OK.
lastly, copy the oraocci12.dll file to the root folder of the project.
Right click on the Project and choose: “Open Folder in File Explorer”. This is the folder where the .dll file must
be placed. The required file can be copied from the main instantclient_12_2 folder
TEST - make sure everything is okay to this point so far by right clicking on the project in the solution explorer and choosing "build". If the built was successful, you can move to the next step.
Connecting to an Oracle database from a C++ Program
So now we will add some code to make sure we can connect we can do a simple test. In the .cpp file we created
earlier, type in the following code to test your connection. It is important that you type it as to learn what is
happening to make completing the project tasks much easier. (Hence why I am providing a screen shot rather than text
so you cannot copy and paste)
Make sure you fill in the usr and pass string with your login and password for your oracle database.
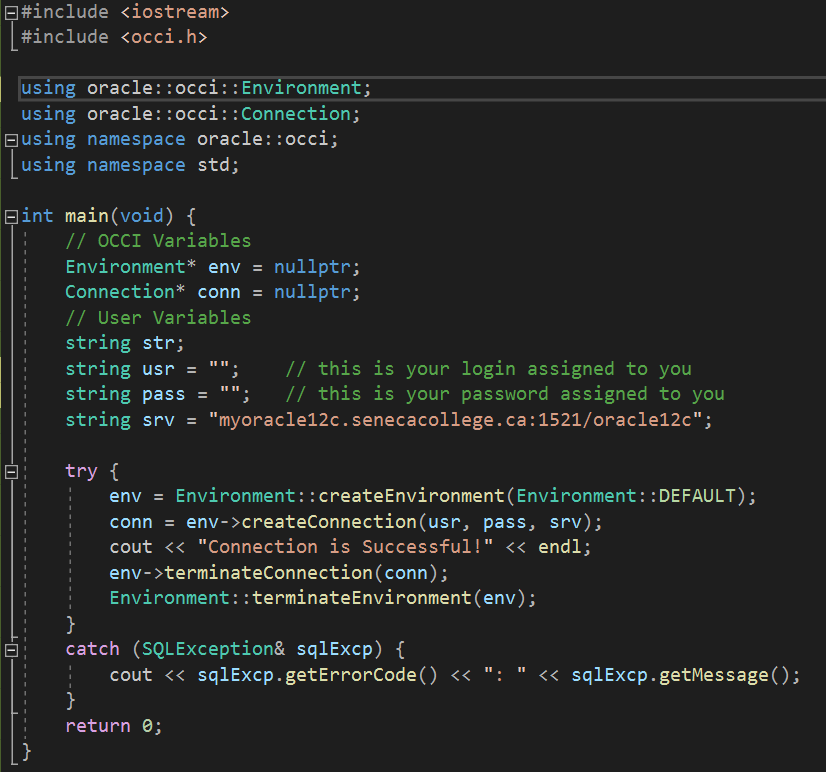
When you run the program, if you see the console screen come up with Connection is Successful, then you are ready to move to the next steps.
Practice Exercises
Running a Simple SELECT query and outputting the results
So we will go through a series of steps to get some output. Type in the following code as shown within the code shown above…. (i.e. merge the two). Use the provided information in class (likely a PPT slideshow) to understand what each line is doing. Some key concepts you will want to understand include:
- Connection (conn)
- RecordSet (rs)
- next() method and how it works
- and all the terminate statements and why they are necessary.

Now to learn this. Complete the same concept, but for the employees table. Some tasks that should be completed as part of working towards the first project milestone.
- the output should be formatted in a way that columns line up nicely
- the appropriate data types are used for the respective database data type
- all open objects should be terminated
- try to modify the SQL statement to include a WHERE clause to return a specific employee number and only show the output for the employee number typed in from a console prompt line.
- Error check the code for a couple things, 1 – the entered employee number is the right data type before trying to query the database and 2 – the employee number exists in the database before trying to output the values to the console window. Give appropriate error messages to the user in both cases.